Well, here it is. The promised pig butchering post. Please be aware that the images in this post are upsetting–even to those of us that eat meat–and I encourage you to not look at this post if you don’t want to see a dead animal/some blood. We are choosing to share this story and these photos because we want to discuss with you, our brave readers, what it really means to be an omnivore. Most of the world consumes meat products daily without a second thought to where it came from/what the life and death of that animal was like. If these photos disturb you, then please take a moment to think very carefully about where the meat you eat comes from–or whether or not you even want to eat meat at all–because I assure you that this is about as “nice” as it gets in the world of animal slaughter.

First and foremost, we want to say THANK YOU to our friends Jenn and Trevor, who helped us with the entire process. They arrived bright and early in their work pants and mud boots, sipping coffee, and they didn’t leave until well after dark when the very last pork chop was wrapped and taped and laid to rest in the freezer. You guys are amazing and I don’t know what we would have done without you! Thank you.
Mike prepared for this day by helping to butcher a hog at a nearby farm and reading nearly every book ever written on the subject. While we intended to prepare some of the traditional American cuts, we also wanted to prepare the meat for some of our favorite traditional Spanish and Italian specialties. Doing so requires a slightly different approach to the butchering process.
While you can gain nearly all of the knowledge you will need to properly butcher a hog from books (this one helped us immensely: Charcuterie: The Craft of Salting, Smoking, and Curing) and YouTube videos, nothing beats experience. Any kind of butchering experience will help, but knowing and seeing the anatomy of the hog and understanding the natural anatomical guides would be very difficult without experiencing the process firsthand. Mike had previous experience from butchering deer but stressed that it is both figuratively and literally, “a different animal.”


It’s not the same thing as hunting. When you hunt deer, you’re not killing an animal that you have an emotional connection to. And most of the time you’re physically removed from them as well–too far away to see their eyes or hear them breathing their last breath. When we killed our pig, we were kneeling right next to her. We petted her and thanked her for her life. She was eating breakfast, and then it was all over. Mike used a gun and she dropped immediately.
We all cried. But I was–even then–struck by how fast it all went and how humane it seemed. She was alive, and then she wasn’t.
After the hardest part was done, I was overcome with energy and the desire to get to work. There’s something therapeutic about physical labor, but I think what I was feeling was more than just a desire to distract myself. I didn’t want any of the meat to go to waste. I wanted us to do the very best job we possibly could, to honor her life.
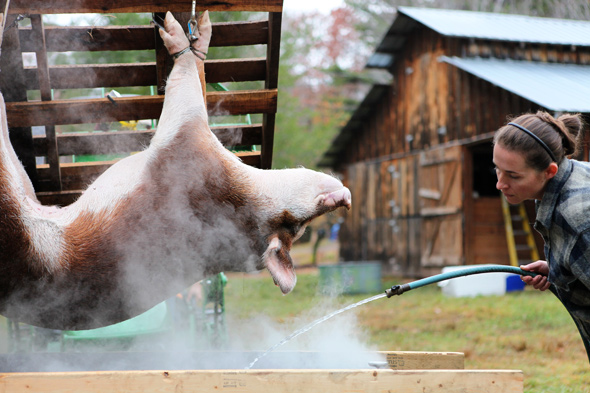
The first task at hand was to move the carcass over to the scalding tank, dip it in, and scrape the hair off. Seeing as she was about 345 lbs, this was a job for the tractor. Trevor and Mike wound wire around the legs, clipped the wire to a pallet on the front of the tractor, and slowly transported her to the tank.
The water needs to be around 165F for scalding hair. We built a fire under the tank to heat the water, and then kept it from getting too hot by running cold hose water into it now and then.


We submerged the carcass until the hair pulled easily from the rough part of the shoulder, and then it was time to start scraping. The tool for scraping off hair is called a bell scraper, and it is your friend. A knife would work in a pinch, but the bell scraper makes this tedious job go much smoother. It is only necessary to remove the hair from the sections that you want to keep the skin-on (some ham and bacon recipes require this). You can filet the skin off of the rest.

Once most of the hair was removed, we cleaned the skin with the hose and moved the carcass over to the barn. This was an exciting moment because it was when we finally were able to weigh her and see how big she was. I guessed 325, Mike guessed 320. She was 345 lbs!

Mike made the first cut, down the center of the belly, so we could remove the organs. This part was fascinating. The insides were so clean and beautiful. Anatomy has always interested me, and it was so neat to get to touch every organ and examine them up close. Bodies are amazing.

We removed the liver and heart and packaged them for the freezer. We then pulled out the small and large intestines and removed the sheath from around them (an external lining that fixes the organs in place.) We squeezed any remaining contents out of the intestines, ran fresh water through them with the hose, turned them inside out and soaked them in water. They are then placed in a salt brine for storage until they are used as casings for sausage.
The small intestines are generally used for fresh sausages like bratwurst and chorizo and are fully edible, while the large intestine is used for traditional European recipes like Soppresata and other salumi varieties. The large intestine is generally not eaten, but used as a casing that is peeled away upon consumption. They are commonly called hog middles.


After removing the head and jowel meat, Mike and Trevor sawed the carcass in half so we could start to section it into the different cuts of meat: hams, belly, picnic ham, shoulder, etc. This was an exhausting job, as you’re cutting through bone. At this step, many folks follow the process similar to butchering a deer–removing limbs and cutting away pieces from the carcass while it hangs. There is no right or wrong method, really. However for our purposes, “halving” the hog was best. We wanted to end up with bone-in porkchops, which require this step. It also allows you to lay the half-hog on a table and to methodically partition it into its respective cuts.

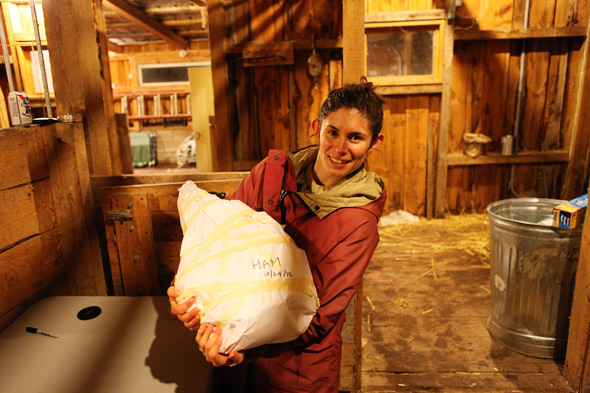
Jenn and Trevor worked on skinning the parts of the carcass where we didn’t need the skin on while Mike cut up the other half on the butchering table. Skinning portions of the hog allow you to gather back fat, which can ultimately be turned into lard, or even more preferably, used in sausage. As Mike would finish each cut, he would pass the meat to me and I’d package them in layers of freezer paper, tape each one tightly, and label them.


This is the pork belly, which is what bacon and Pancetta are made of. In this photo Mike is sectioning the ham {hind leg} away from the belly. The ham can be used for American-Style glazed holiday ham or can be made into your own version of Italian Prosciutto or Spanish Iberían Ham. It is best to use a giant meat clever and a mallet instead of a bone/meat saw. A saw tears the meat while a clever leaves a clean cut.

This is what one of the hams looked like after it was packaged. HUGE!! I could barely lift it! It is okay to freeze hams that you intend to cure and/or hot smoke, though if you intend to salt and air-dry a ham (Prosciutto) then it is best done fresh.

This is what over 300 lbs of meat looks like in the freezer…When it was all said and done, we only had about 20 lbs of waste. The only parts we did not use were the head, the stomach and the gall-bladder (all of which we could have used, but we’re not particularly fond of the products they make–such as Head Cheese.) It felt really great to have so little waste! The fact that every part of a pig’s body is useful and edible is the main reason it is the most popular meat animal in the world.
The next steps for us are to render the lard we saved, cure the cuts that need curing–such as the belly and hams–and to make different kinds of sausage. We will follow up with posts about these projects soon, so stay tuned!
So tell us…after seeing the process from beginning to end, how do you feel about eating pork? I’m anxious to hear your thoughts. I’ll leave you with the closing point that it is our belief that this pig’s life (and death) was much more humane than it would have been in a commercial slaughter-house.


