A close friend of ours got married last weekend, and naturally I wanted something nice to wear to the wedding. Buuuut, we live several hours away from any semblance of a mall. This is a blessing and a curse…on one hand, we are never tempted to run to Target to buy random stuff. On the other hand, I can’t just run to Target and buy a cute maxi dress whenever we’re invited to a wedding. So, I decided that this would be a great opportunity to hone my sewing skills, and make something rather than buy something. I hurried off to the fabric store in town, hoping for a beautiful spring-y colored fabric to jump out and inspire me.
The only fabric store around here is a quilt shop, which carries almost exclusively cotton fabric in quilt-y patterns, if you know what I mean. Not exactly dress material. I was feeling a little woeful until I spotted a bundle of 100% organic white cotton, and it dawned on me that I could dye it to be whatever cheerful spring color I wanted.
With the white fabric in hand {luckily it was a very high quality cotton!} I went home and commenced my research about fabric dyeing, which was a completely new adventure to me. Not only did I want to make sure my finished product would be color-fast so that I could wash it and care for it like normal clothes, I also needed to make the dye from biodegradable and all-natural ingredients. I found this great blog post {on one of my favorite blogs! They have fantastic posts!} about using food to dye fabric, and this list of all-natural dye sources, which lead me to choose Tumeric in hopes to achieve a bright yellow color. It turns out that natural fabric dyeing is actually quite simple, with quick and stunning results.
Supplies:
White vinegar {for plant dyes} or salt {for berry dyes}
Dye source of your choice
Large aluminum pot {aluminum helps to set the dye in the fabric, for some chemistry-related reason I don’t fully understand. Just go with it.}
White or light colored fabric {natural fabric like silk, cotton, wool, and linen work best}
Rubber gloves
 {My mom and I found all the supplies, besides the fabric, at the local supermarket in my Grandma’s neighborhood. So easy and cheap!}
Steps:
Wash and dry your fabric according to its type. Mine was 100% cotton, so I washed it on cold and dried it on low. The purpose here is to get the starch out of the fabric.
Once it is clean and dry, simmer your fabric in the large aluminum pot for one hour in a mixture of water and vinegar {four parts water to one part vinegar}. The vinegar acts as a fixative. If you’re using berries as your dye source, use salt instead of vinegar {1/2 cup salt to 8 cups of water}.
 {Isn’t my Grandma’s kitchen SO cute? A big thank-you to her for letting my mom and me do this whole project at her house! It was really fun to hang out and make something together!}
Rinse and ring out your fabric thoroughly in cold water until it no longer smells like vinegar, and set it aside- still damp- while you prepare your dye bath.
Fill the aluminum pot with fresh water- no vinegar this time- and heat it up to a simmer.
Add your dye source to it until the water is visibly tinted. I sprinkled Tumeric into the water and stirred until it dissolved and I could tell that the color was opaque enough to stain my fabric. It was about 1/2 cup of Tumeric. You’ll have to just play around with this, there’s no exact measurement since it depends on how dark/light you want your fabric to be in the end. You can dip a tip of your fabric into the bath to test its strength.
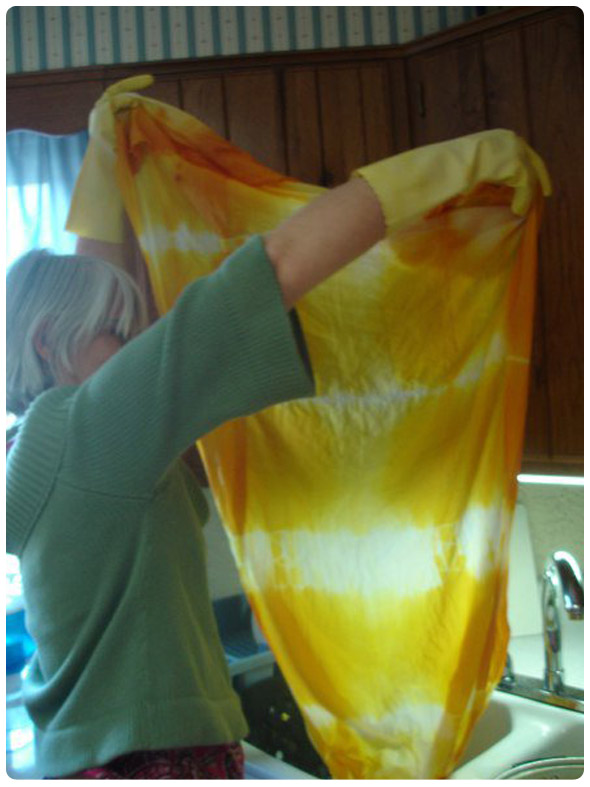
Let the dye bath simmer without the fabric in it for 10 minutes, and meanwhile, tie your fabric in any pattern you want with cotton string. Where the string is, the dye will not penetrate as well, leaving white or very light-colored areas for a “tie-dye” effect. This is an optional step- you could just dye the fabric without tying it.


Submerge your fabric in the dye bath and simmer for 15 min. Turn/stir the fabric every once in a while to make sure it is not sticking and burning on the bottom of the pot.

After 15 minutes, turn off the heat and let the fabric sit in the pot for as long as you want {overnight if you want the deepest possible color.} I only let mine sit for 10 minutes because I wanted a soft, pastel color.
Remove the fabric from the dye bath when you have reached a color that is about two shades darker than your desired color, untie the string, rinse with cold water and ring gently until the water runs clean and no more dye comes out. It will lighten about one shade during the rinsing step.
 Hang the fabric to dry, or put it in the dryer on “air fluff” until it dries. It will lighten about one more shade as it dries. Now it is ready to be made into whatever beautiful creation you can think of!

My mom took over the project at this point, because it was clear that my meager sewing skills were not going to cut it. She {without a pattern!} sewed me a beautiful pleated, floor-length skirt with a hidden zipper in the back. THANK YOU, MOMMY! I looooove it, and it was perfect for the wedding!


So cute. You should make more of your clothes!
Mike
Thanks, boo.
Soooo cute! You’re inspiring me… As are your mom’s sewing skills. No pattern? Whoa.
the dying looks like so much fun, I totally want to see what berries would look like!
Absolutely beautiful!
A fun, fun project by a very creative duo, with A.M.A.Z.I.N.G. results! Kudos!
p.s. Can you say Northwoods Sewing Weekend mini project???
YES! We are totally dyeing fabric this year!! Bring white fabric!!
wow! your skirt looks amazing! thanks for the lovely tute too!
This was such a cool project! The outfit looks great and the color of the skirt is gorgeous. Also- I like the brewhouse tee-shirt you’re sporting in one of the pictures!
wow!!! i can’t believe how gorgeous that fabric turned out. And your mom is AWESOME for making you such a killer skirt. I want one!!!!!
Thank you guys!! It was a fun project and I can’t wait to try more dyeing with different sources we collect from around the property. If you try any, let me know!! toniasimeone {at} gmail {dot} com.
fuck the skirt. your HAIR looks amazing!!
p.s. i like how “honing your sewing skills” = handing the fabric to your mom!
totally.
Wow I love this. The skirt looks amazing. I couldn’t sew to save myself and neither can my mum but this is a great idea for bringing new life to old white cotton shirts. Will be interesting to see what the dying process turns out like with pre-loved material.
Just stumbled onto this page looking for natural dye how-to’s … Great blog!
I have a cotton dress that’s solid white on top (solid green on the bottom) – do you know how I could dye just the top part? Everything I find is for dying the whole piece. Thanks!
Hi Mary! You could “dip-dye” the top part of the dress by only submerging the top in the dye bath. The easiest way to keep it in place would probably be to use clothes-pins to fasten the garment to the pot. I would use plastic clips, because wood ones will absorb the dye if any of it touches them, and it could then transfer/bleed into to the skirt of the dress.
You could also just patiently hold the skirt out of the way while the top simmers in the bath. Some dye sources are so strong that they will color your fabric in only a few minutes, so your arms won’t even have a chance to get tired of holding the skirt away. Dip-dyeing is really popular right now (“ombre” is so “in” at the moment).
Overall, I think the key with this kind of project is to go with the flow and not have too strong of an idea of how you want things to be, because natural dye is very unpredictable, and it might not turn out how you imagined…it might be better! Good luck! I would love to see the finished product!!
[…] intrigue about fiber arts started when I randomly decided to dye cotton with turmeric to make a skirt. Since then, my mind has been going going going about what else (berries, plants, nuts, etc.) I […]
[…] over at the blog Itty Bitty Impact naturally dyed fabric for a party dress, and directed me to the blogs Crafting a Green World and […]
[…] for online research I recommend these links: pioneer thinking, turmeric dye, and crafting a green […]
how beautiful. I’m inspired to dye my big Ikea heavy white cotton Curtains a goldie yellow.
How about cleanup? How did the turmeric scent and stain both come out of the fabric, the pot, the dryer? I hope to do my project in the washer/dryer.
Thank you so much!
working toward urban frugal environmental lifestyle
Hi foggy! The tumeric did stain the pot I used. I scrubbed it real well afterwards, but it didn’t come out entirely. Maybe pick up an old aluminum pot from a thrift store to do all your dyeing projects in if you’re concerned about this. Other than that, clean-up was easy! The dryer did not get stained, nor did the sink that I rinsed the skirt in…but you might want to rinse in a laundry tub just to be safe if you have a nice white kitchen sink and you want it to stay that way.
[…] cute is this skirt made with fabric dyed with Turmeric?(I definitely want to try […]
love the skirt, and I’m going to try the turmeric dyeing method for a bedspread of mine! also, can I ask where your lace blouse is from?
My shirt was from Anthropologie. Found it on sale last spring, so it’s probably not available anymore. :\
Great post.. dying a cotton skirt of mine as I type.. I like the idea of ombre… might just try that.. so exciting.
The skirt looks awesome but if it was may be just above the knee it would have looked wonderful, because the longer it is you have to make it more a line to look pretty or it has to be just straight.
I LOVE THE PLEAT IN YOUR SKIRT LOVELY AND THE DYE AS WELL
[…] hue. Used particularly to dye saris & Buddhist monk’s robes.Follow these guidelines, How to Make Natural Fabric Dye from Itty Bitty Impact. Even use to dye your natural yarns for knitting (silk, wool, cotton, […]
Thanks for this! I’m going to dye a baby wrap that I bought from linen! Cool!
I love this article. I have decided to go organic and start making clothes for my five month old girl. You have inspired me!
O M G! gonna be using this! i thought you were a guy but then i saw u in the dress and thought: No guy is that pretty hahah well done!! 😀
I just used these instructions to dye two pillow cases!! I used purple iris petals for one half and tumeric for the middle of the pillow cases like a little sunshine when they’re together on my bed! :3 It’s so interesting to read your blog and see the pictures! The pictures are great. You and you’re mother are so adorable!<3
Wow! Just finished this on some cotton muslin type material I had that I am going to make into a scarf. Love the colour achieved with this and no nasty chemicals involved!!
Might as well thank you for the great tutorial.. Waiting for the boil-hour to end as we speak. Thank you soo much!
did the pot get stained?
love it
Thank you for explaining so well how to do this. I was looking for a natural dye to give a nice yellow colour and found your page.
What a nice colour and you looked great in the long skirt your mom made.
[…] Where I got the idea to use Turmeric – side note – really like this blog, might have to start following it on a regular basis […]
Thanks for this the tips I’m using it for a school projet thanks once agaain
[…] great tutorial can be found here: itty bitty IMPACT or simply google “DIY Natural Fabric Dye” for tons of ideas! I can’t wait to try […]
Hi, do you happen to know how the vinegar can work ,although you rince it out?
Your Mom, is my twin. I have sent her photo to my husband, daughter and best friend and everyone of them can not believe it. She even has the same goofy smile I have. weird. and What’s weirder still is the reason I saw the photo is I was looking at how to dye fabric with Turmeric!
LOL! Ah the Internet[s] where you can find your doppelganger.
This is gorgeous! I just found your website while searching for the method I need to make my vegetable and fruit dyes permanent. So happy to have found your sweet spot on the web!
xo
Eleanor
our new website is coming soon!!! for now check us out on facebook/softlove handmade cultural accessories and facebook/local lands( our family organic farm)we do handmade clothing( 100% fabrics, hand dyed), accessories(crochet, knit, leather, suede, felt&more) & natural products( soaps,lotions, body butters, pure essential oils, incense, shampoo’s, lipbalms& more)… ok for my question, lol as im in search of more natural ways to dye fabric i came across your site and im so so impressed!, i wanted to know how long does the color last in clothing when done this way and how often do you have to redye if necessary…. thanks a bunch !!!!!! for letting me share about my site and allowing me to ask a question keep up the beautiful work mom! and yes grandma kitchen is super cute:)
Hi Mea, I haven’t had to redye the skirt at all. The dye has held up really well. Tumeric is photo-sensitive, however, meaning it fades in the sun, so I try not to wear this skirt outside on super sunny days. Since it’s kind of a formal, long skirt I usually wear it for fancier events which tend to be indoors anyway, so I have not run into any trouble with the color fading.
I just tried this with 2 chair covers and am so excited, but it looks like one turned out burnt orange and not yellow at all for some reason. Any ideas on how I might fix it and get them to get the same or similar in color and leaning more toward the yellow scope?
Ohh I just stuck the darker burnt orange in a vinegar mix and it turned bright yellow. Now to get the 2 yellows to match….hmmm
Hi Heather, glad to hear the vinegar worked….I didn’t run into that at all when I dyed my skirt so I’m not sure how to advise you. Hope you figure it out! There is always an elemet of surprise when working with natural dyes. 😉
[…] blog this week to share this fun project…The most popular post I ever wrote, by far, was this one about dyeing fabric with natural, homemade dye. I honestly haven’t done much fabric dyeing since then, but last […]
Tonia, This tutorial is perfect for a ‘home school’ science project on natural dyeing. While there are all sorts of technical instructions, we wanted something fairly simple and easy to achieve just to get started. Something that would give results to whet the appetite before getting into strict technical protocols. The info about the aluminum pot was a tip that I hadn’t found in prior research. I can’t wait to do some pretesting and then work with the small home school class. Another home school class will be on using the fabric dyed. Thanks for the fun post.
Thanks for the post. You and your mom rock!